Forfunly crochet guides
Single Crochet Increase and Decrease: US Amigurumi Practice
Increases and decreases change the width of crochet fabric. Learn the movements before shaping a character. This lesson uses US single crochet, continuous rounds and a first-stitch marker. Your project may use a different stitch or joining method; check its abbreviation key first.
Illustrations updated
What should you check first?
A single crochet increase usually means two sc in one stitch. A standard sc2tog combines two stitches into one. An invisible decrease uses the front loops of two neighboring stitches and can reduce visible gaps in right-side-out amigurumi. Use whichever method your pattern defines.
Start where you can identify each stitch
Use an open practice circle with a checked stitch count. Find the two loops that form a V at the top of a completed stitch. Unless the instructions say otherwise, ordinary single crochet goes under both loops. Keep the working loop comfortably on the hook shaft.
Place a marker in the first stitch of the round. For the exercises below, a starting chain is not counted and there is no joining slip stitch. These choices belong to this exercise; they are not rules for every pattern.
Make two single crochets in the same stitch
Insert the hook under both top loops of the next stitch. Yarn over, pull up a loop, yarn over again and pull through both loops. That completes the first sc. Insert the hook into that same original stitch and complete another sc.
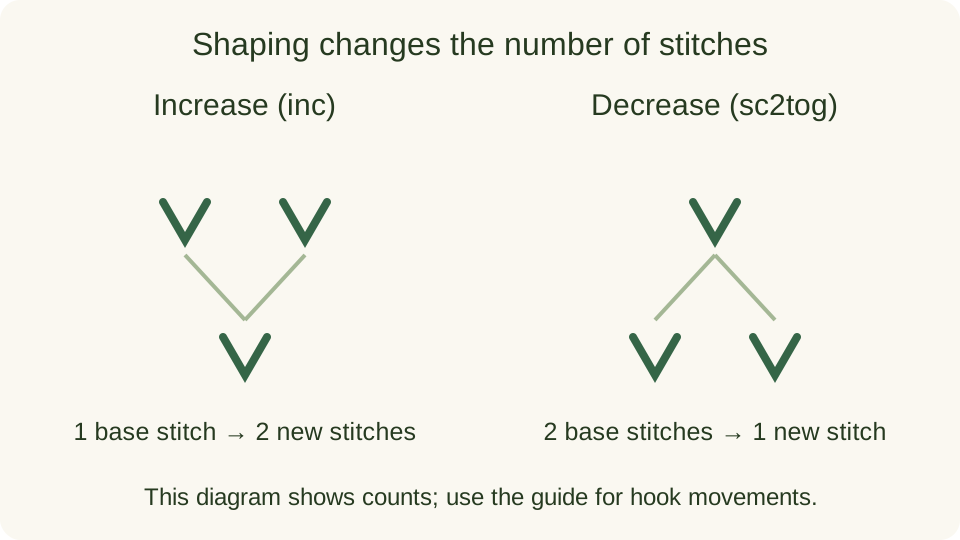
One old stitch now supports two new stitches, so this increase adds one to the total. Do not place the second sc in the following stitch: that would be two ordinary stitches rather than an increase. Mark an increase temporarily if its shared base is hard to see.
Work a standard sc2tog
Insert the hook into the next stitch, yarn over and pull up a loop. Insert into the following stitch, yarn over and pull up another loop. You now have three loops on the hook. Yarn over and draw through all three to finish.
This standard decrease uses two old stitches and creates one new stitch. Keep each pulled-up loop near the same height as the surrounding stitches. Pulling sharply on the yarn can make the next stitch difficult to enter without fixing the structure.
Compare the invisible decrease
For standard right-side-out amigurumi, insert the hook under the front loop of the next stitch, then under the front loop of the following stitch. Yarn over and pull through both front loops. Yarn over again and pull through the remaining two loops on the hook.
The front loop is the top loop nearest you while you work. This method leaves the back loops unworked and can make the decrease less noticeable. It is not interchangeable with every special decrease: follow the pattern, particularly when a particular texture or wrong-side-facing fabric is intended.
Check a small increase and decrease sequence
Starting with 12 stitches, repeat (sc, inc) six times. Each repeat uses two old stitches and makes three, giving 18. On a subsequent practice round, repeat (sc, dec) six times. Each repeat uses three old stitches and makes two, returning to 12.
Count the completed round before continuing. If the total is wrong, look for an increase worked into two different bases, an accidentally skipped stitch or a decrease using the wrong pair. Undo to the error and work it again instead of placing a correction randomly.
Compare the fabric before using a full pattern
Try both decreases on separate samples with the same yarn and hook. Compare the stitch openings and how easily the hook moves. Keep the sample as a reference, then use a complete pattern for the actual shape, stuffing and finishing steps.
Find your next crochet design
Choose a project to make or a finished piece to buy. Check the selected option before ordering.
- How to Count Amigurumi Stitches and Track Rounds
- Learn with a US single crochet practice square
- Ask about a product’s contents or instructions
Before ordering, read the current shipping and returns information.
Further learning
For stitch names, see the Craft Yarn Council crochet abbreviations. For difficulty, see its project skill levels. Follow the pattern for your project. Check the product page for what you will receive.
Explore all crochet guides →