Forfunly crochet guides
How to Sew Amigurumi Parts: Placement and Neat Joins
Ear or arm placement can change a crocheted character’s expression. Plan the position before sewing, then attach one part at a time. This lesson explains general placement and joining; your project’s assembly diagram and seam method take priority.
Illustrations updated
What should you check first?
Mark the center and attachment points, hold the parts in position and compare the front, sides and back before sewing. Join with small, controlled stitches using the pattern’s method, checking the position as you go. Secure the yarn ends and remove every temporary marker or pin.
Check when and how the pattern attaches each part
Read the assembly instructions before closing the body. Some parts are crocheted into a round; others are sewn through an open rim or attached after flattening. These approaches create different joins. Do not close a part simply because another tutorial does so.
Check whether the pattern leaves a sewing tail, adds stuffing or marks particular rounds for placement. Thread a suitable yarn needle with the stated joining yarn. Keep scissors, needles and pins controlled on your work surface, especially around children and pets.
Mark the body’s reference points
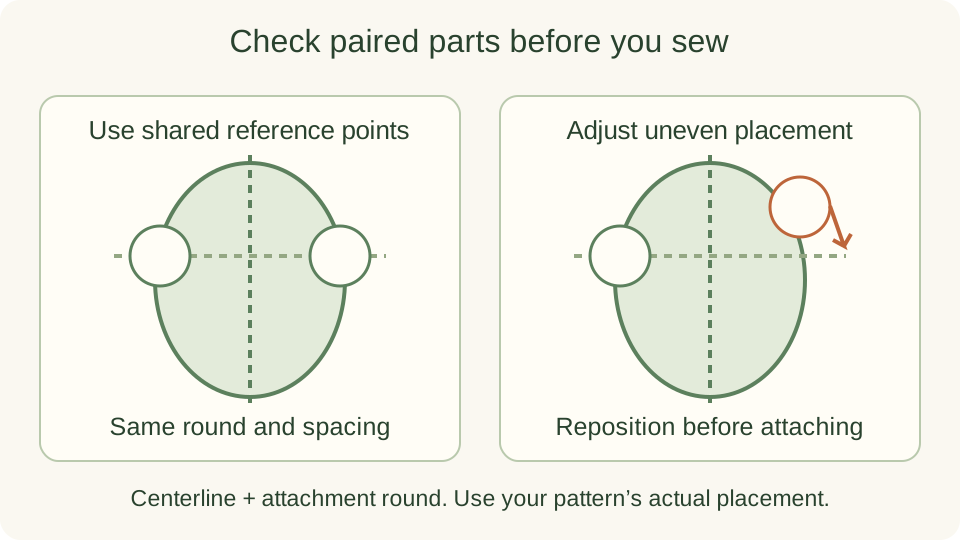
Identify the intended front and back, then use removable markers or contrasting waste yarn to show the centerline and attachment rounds. A continuous-round start can drift relative to the visual center, so do not assume the round marker always marks the face.
For paired parts, count outward from the same reference point on each side. Record both the round and the spacing. If the body is soft, support it without squeezing, since compression can make a level placement appear tilted.
Hold the parts and inspect the whole character
Use suitable pins or temporary yarn stitches to hold the part at several points around its edge. If using pins, count them in and keep a written count to check when removing them. Temporary placement should stay accessible rather than being buried in stuffing.
Set the character on a level surface and view it from the front, both sides and above. Compare the height, angle and distance from the centerline of paired parts. A quick photo can reveal a tilt that is hard to notice while holding the piece.
Build the join a few stitches at a time
Use the seam specified by the pattern. For a simple open-rim attachment where a whipstitch-style join is appropriate, pass through a rim stitch of the part and a corresponding stitch on the body, then repeat along the attachment edge. Catch sound stitches rather than splitting loose yarn strands.
Pull each stitch just snug enough to bring the surfaces together. Excessive tension can pucker the body or drag the part out of position. After several stitches, stop and compare the alignment again. Adjust while only a short section is attached.
Compare the second part before securing the ends
Position the second ear, arm or other matching part using the recorded reference points. Compare its angle with the first attached part before completing the seam. Matching counts help, but visual checks still matter because handmade pieces can vary slightly.
Complete the seam without leaving an unsupported gap. Secure and weave in the joining yarn as instructed, keeping enough tail to work safely before trimming. Weaving through several sound stitches helps distribute the hold; a concealed loose end alone does not secure a join.
Remove temporary tools and inspect the result
Remove and recount all pins, then remove temporary markers and waste yarn. Check for exposed sharp tools, loose seams and detachable small parts. These steps are assembly checks, not proof of toy safety or age suitability. Follow the product’s guidance for its intended recipient and use.
Find your next crochet design
Choose a project to make or a finished piece to buy. Check the selected option before ordering.
- Amigurumi Stuffing and Finishing: A Practical Checklist
- Learn with a US single crochet practice square
- Ask about a product’s contents or instructions
Before ordering, read the current shipping and returns information.
Further learning
For stitch names, see the Craft Yarn Council crochet abbreviations. For difficulty, see its project skill levels. Follow the pattern for your project. Check the product page for what you will receive.
Explore all crochet guides →